

Image: Daily Host News' blog
This article is part of #ServerlessSeptember. You'll find other helpful articles, detailed tutorials, and videos in this all-things-Serverless content collection. New articles from community members and cloud advocates are published every week from Monday to Thursday through September.
Find out more about how Microsoft Azure enables your Serverless functions at https://docs.microsoft.com/azure/azure-functions/.
In this article, I will be walking you through how to create and setup a webhook on GitHub, connect the webhook with a newly created API via an Azure Function code which would enable the API to listen to GitHub Wiki update events (Gollum events, in this case).
You would also learn how to update their function code to parse information from the GitHub webhook payload, and hence display the results from the payload.
Getting Started
Our first step here would be to deploy a function app, to do this you need to check off some basic requirements needed to get your function in the cloud, which are listed below.
Requirements
• Basic knowledge of Azure Functions
• Basic knowledge of JavaScript
• An Azure Subscription
• A GitHub account
After getting the requirements stated above, sign in to the Azure Portal and create a new resource, as shown below.
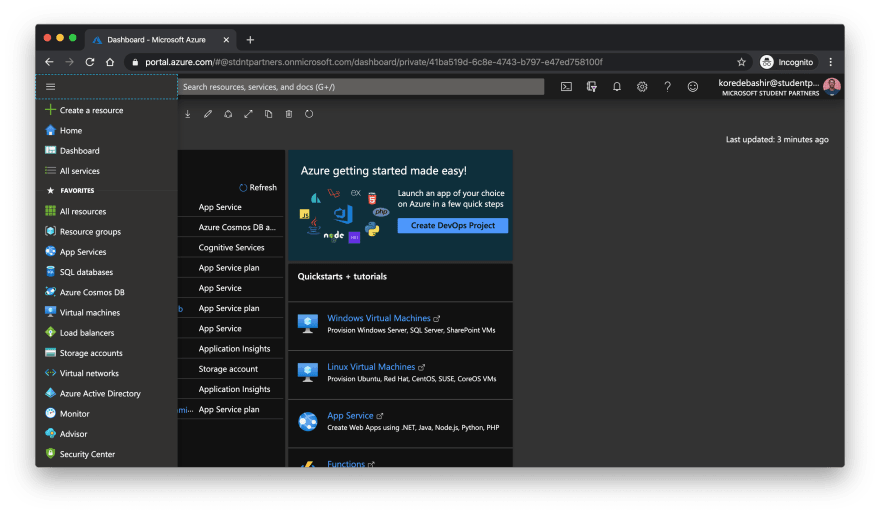
Click on the + icon to create a resource
In the following blade, click on the Compute option to reveal the Function App resource we would be using to deploy our function.
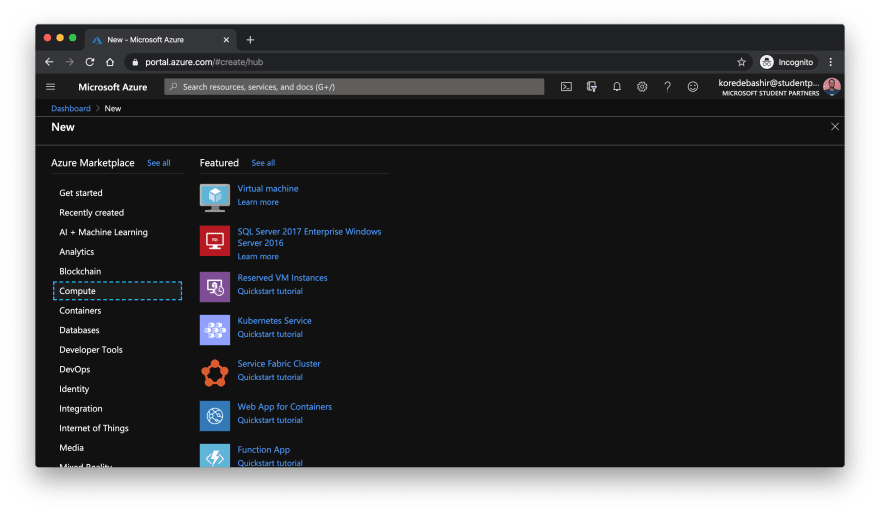
The Azure Functions resource
In the next blade, you'll be required to provide how you want your Function App to be provisioned; just as below;

Enter a unique appname, this is also the Function App's URL
Click on Create new to create a new resource group. I didn't create a resource group, because I do have a resource group already - which houses all the functions I've ever created on my Azure subscription.

Storage and Plan type
Select Node.js as runtime, as we would be working with JavaScript. Then hit Hosting to move to the next blade
On this next blade, since we're not really working with storage in this tutorial, a storage account would automatically be created for you with the consumption plan I mentioned in the first part. Leave everything as is here, then click Review + create. But, do ensure the Windows OS option is selected. Very Important!
The following blade would be the option to review all the information you have provided Azure to provision your Function App instance. Review thoroughly, before hitting Create. Mine looks like this, below;
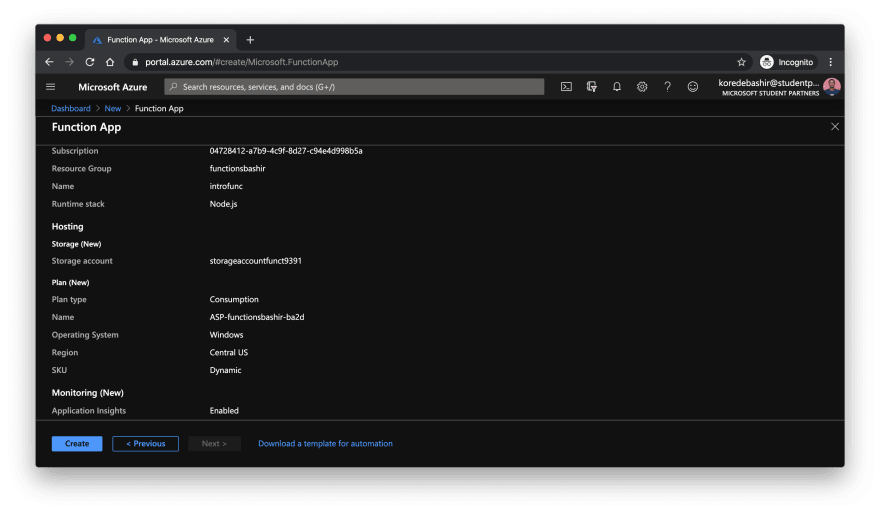
Review of my Function App instance
When you're done with reviewal, and after creating the Function App instance - you can monitor the progress of your Function App deployment from notifications (that "bell" icon). When the resource deployment is complete, click Go to resource to reveal the newly created Function App instance.

Go to your deployed resource
While on the overview page of your Function App (remember that this instance can hold multiple functions - JavaScript functions, 'cause of our runtime), click on the + icon on the left pane to add a new function to your Function App.

Click on the + icon
On the following screen, click the In-portal development environment option before hitting Continue.
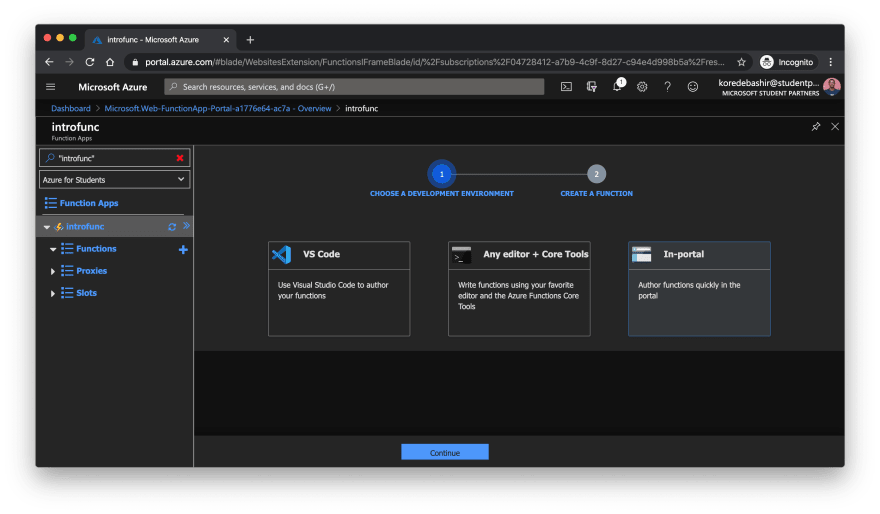
Select In-portal, then continue
NOTE: There are various Azure Functions templates which all serve different purposes. In this Serverless guide, just the Webhook + API template (which also includes the HTTPTrigger template) would be covered.
• Going forward, select the Webhook + API option, then click Create.
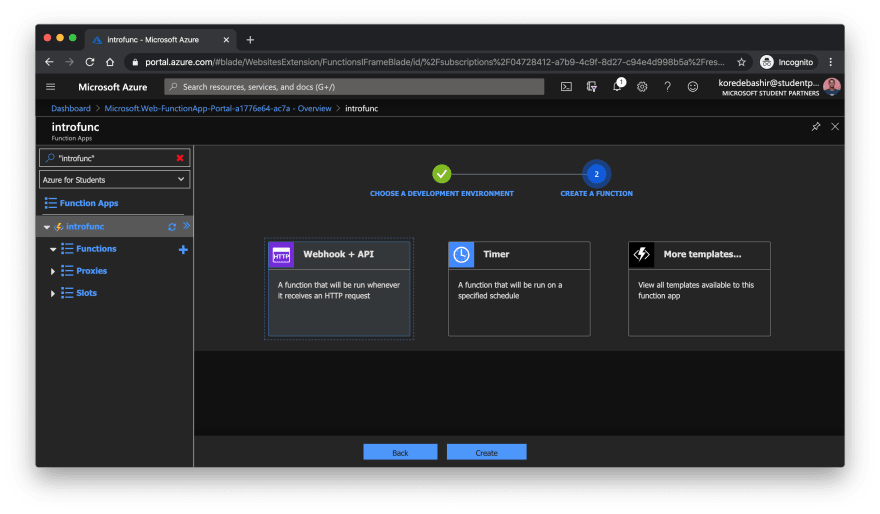
Select Webhook + API
The next screen that comes up after clicking Create is an overview of your newly created function, with an in-portal development environment for editing and compiling your code.
As a start, we would be testing this code out - before going forward with reconstructing the function code to suit the project we would be creating in this article.
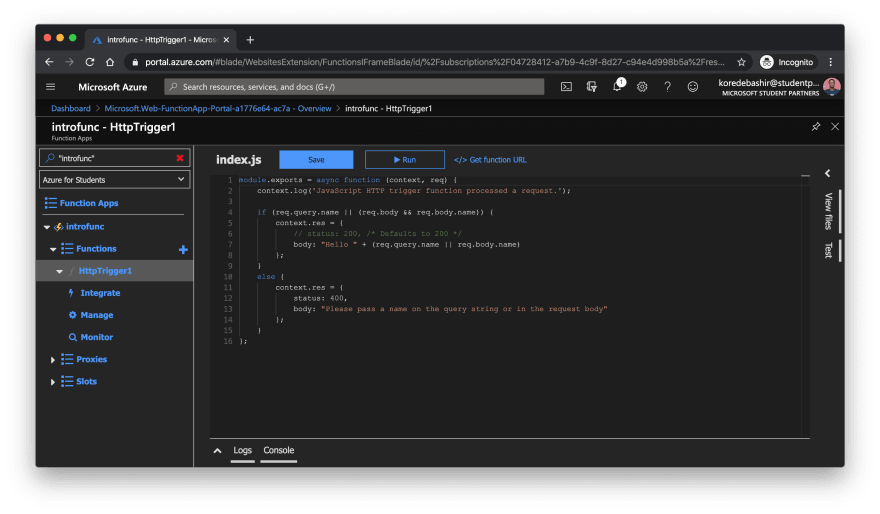
An overview of the newly created function
And to begin with, click on the Get function URL button to reveal the URL for your HTTP-triggered function code (yeah, we just deployed a code snippet in the cloud). This URL includes an authentication key for accessing the content of the deployed block of code which has been included in the copied URL. Paste this URL in a new tab on your browser to access the content of your function code.
When the URL page loads up, the first screen you are greeted with is an exception with a message, as shown below. A comprehensive detail on the error can be found in your logs from your in-portal environment. To clear the error message, pass in a parameter - as shown below.
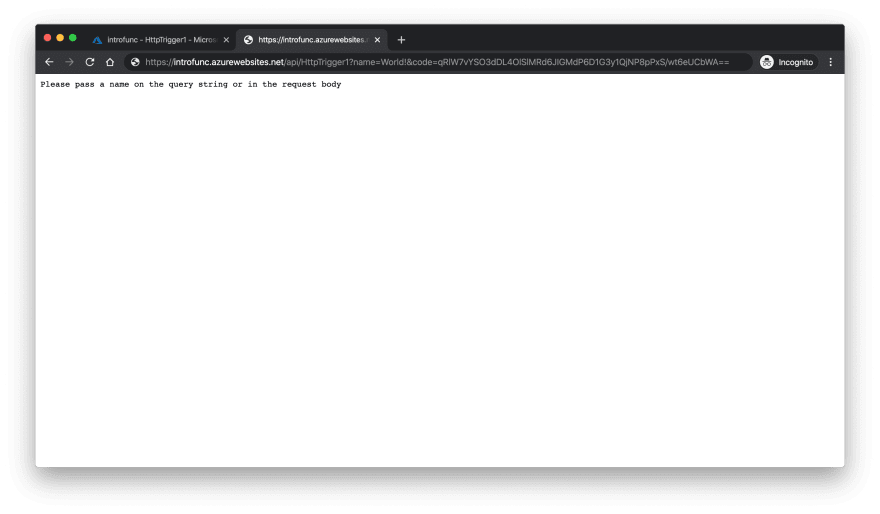
Add a name=any random letters& parameter, as shown, to clear the error message
NOTE: The & operator before the code parameter helps in passing multiple parameters to an API
After passing in the name parameter, you should be greeted with a page similar to the one below!

Hello World! You just successfully deployed a function
To reveal the bindings for your created function, click on the View files panel - on the right side of the portal. Then click the function.json file to reveal the input (trigger) and output bindings - these are denoted with in and out.
There's also a Test option on the right pane, where you can include and compile code to test for edge cases in your function. BTW,
What Do These Function Bindings Do?
The code snippet below should be the same as the code in your function.json file. And the description of what this code does is stated below this snippet.
{
    ...
    "bindings": [

    //binding for input/trigger starts here
        {
            "authLevel": "function",
            "type": "httpTrigger",
            "direction": "in",
            "name": "req"
        },

    //binding for output starts here
        {
            "type": "http",
            "direction": "out",
            "name": "res"
        }
    ]
    ...
}
As can be seen, the code is in JSON format which is written in key/value ("key": "value") pairs - this should give you a proper sense of how the description of the code snippet above would go.
The first key from the input trigger binding is authLevel which describes the security (authentication) level for your function, there are only three values (or levels, in this context) that can be passed to this key, which are; the function, anonymous, and, admin levels.
• The anonymous level means that a function does not require a security (authentication) code to execute or provide responses to requests.
• The function level - used in our trigger - means that a function does require a security (authentication) code to execute or provide responses to requests. The trigger binding default value.
• The admin level - used in our trigger - means that a function does require a master security (authentication) code to execute or provide responses to requests, which means that only a user with administrative access (with the master code) to the Function App that hosts the function can execute the said function.
Moving on, the second key from the input binding is type, which indicates the kind of event that the function would be handling - in our case, HTTP-triggered events - hence, the httpTrigger value.
The third key from this same input binding is direction which denotes the kind of binding in the first bindings block, in this case in for input.
The last key from the input binding is the name key, which accepts the variable name used in the function code, for the request (input) or response (output) bodies, as value.
Now, the output binding has three default keys; type, direction, and name; which define the response provided by your function. More key/value pairs can definitely be added to suit your function definition.
The first key from the output trigger binding is type which indicates the kind of value that the function would be processing - in this case, http, since we would be sending responses to a webhook or the web.
The second key from this same output binding is direction which denotes the kind of binding in the second bindings block, in this case out for output.
The last key, also, from the output binding is the name key, which also accepts the variable name used in the function code, for the request (input) or response (output) bodies, as value.
Next Up
We would be creating and setting up a webhook on GitHub, connect this webhook with our newly created API (we would be making changes to the function code) to listen to Wiki update events (Gollum events).
As a reminder, webhooks offer a lightweight mechanism for apps to be notified by another service when something of interest happens via an HTTP endpoint. A webhook can be used to trigger an Azure function, and then analyze the message, to determine what exactly has happened and how best to respond to the event.
What you want to do at this point is to sign in to your GitHub account and create a new repository.
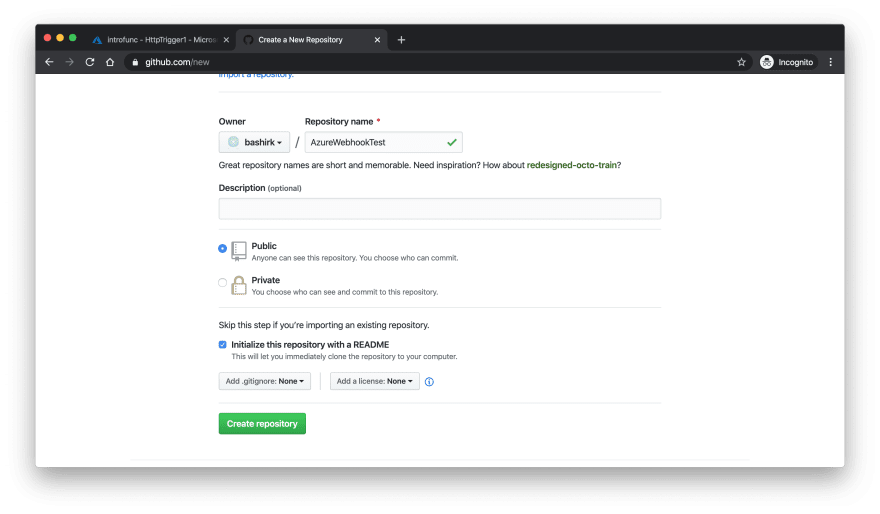
Create a new repository
Create a new public repository by clicking the New button and provide a meaningful name, something like AzureWebhookTest.

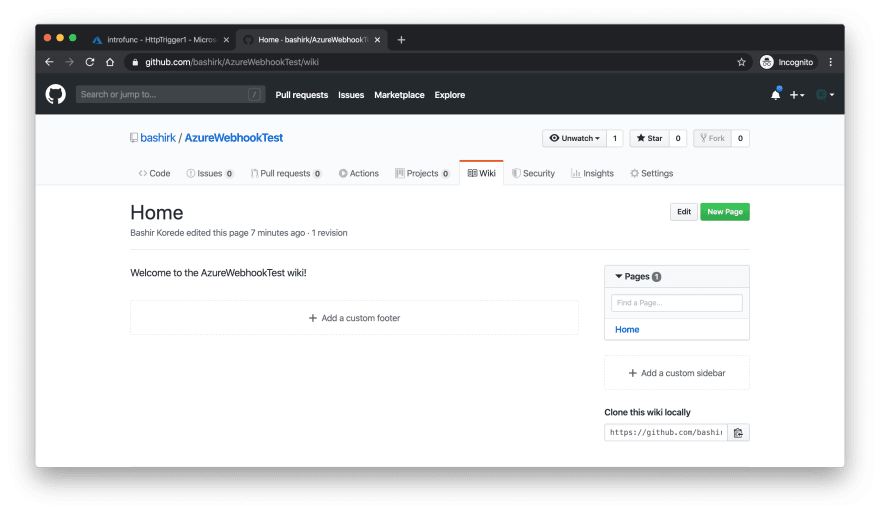
Wiki creation page

Add basic texts, and save
Next, select the Wiki and Create the first page, add some basic texts before clicking Save page.
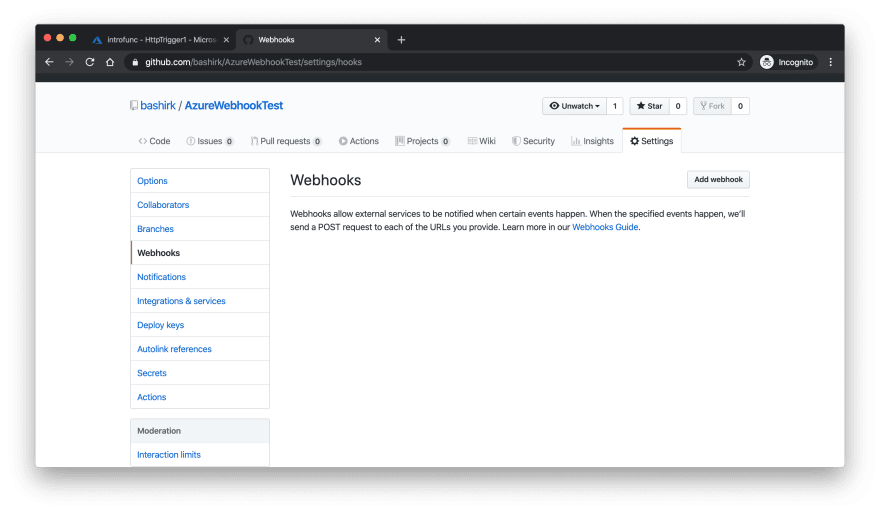
Add a webhook
Next up, set up a webhook by going back to the Settings tab, select Webhooks then Add a webhook. You'd need to set a payload to the URL for your function, similar to this below:
https://.azurewebsites.net/api/HttpTrigger1?code=
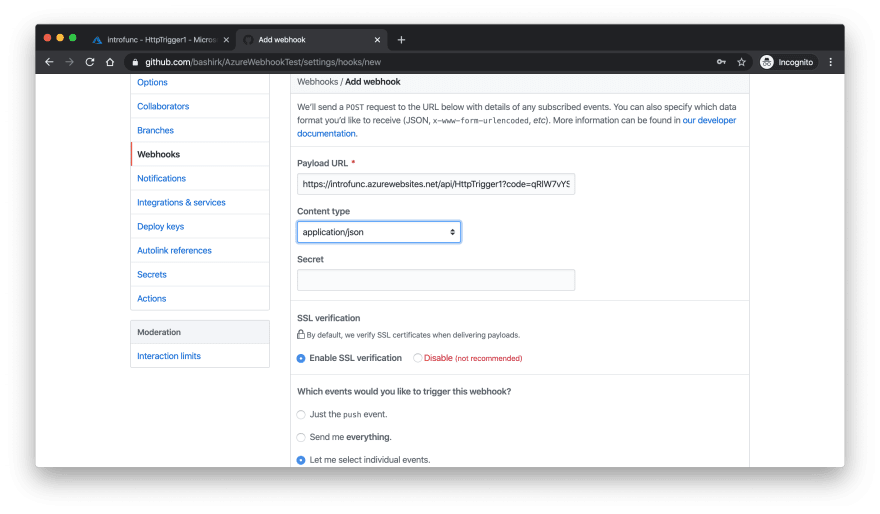
Webhook configurations
There's a section that says; Which events would you like to trigger this webhook? do select the option labeled Let me select individual events. Do also change Content type to application/json
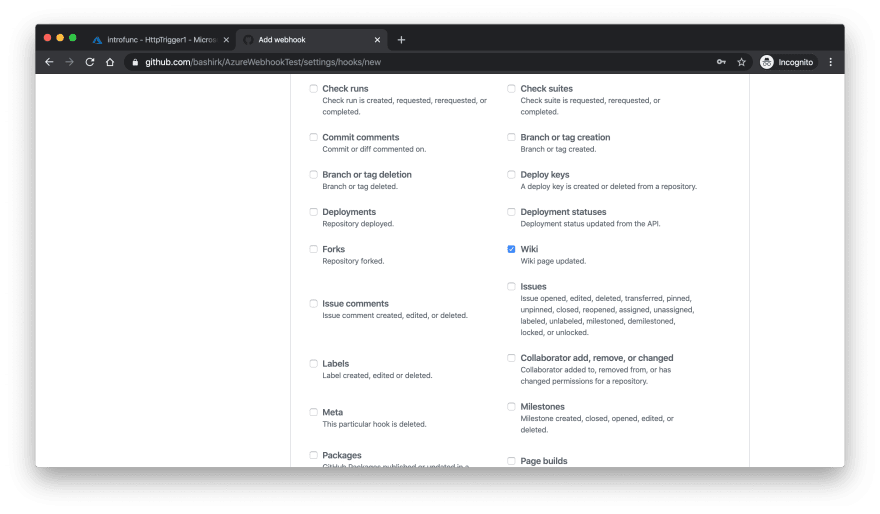
More webhook configurations
Be certain to select the Wiki checkbox. No other check boxes should be selected. Also at the bottom of the Webhooks page, ensure Active is checked and select Add webhook.
You can now verify that everything is going according to plan, when the Webhooks page is displayed.
Webhooks are basically HTTP callbacks that are triggered by specific events, and are always defined by users. An HTTP request is made to the URL configured for the webhook, by the source site, when an event occurs.
Setting up a webhook is a two-way process. a) You can specify how you want your webhook to behave through GitHub and what events it should listen to. b) You can also set up your function in Azure Functions to receive and manage the payload received from the webhook.
Testing the Project
To test out the newly created Webhooks project, go back to the Wiki tab from your repository, select the created page, edit and input some texts - say, Hello World.

Click the Save Page button to save this edit. Now to add a payload to the URL for your function app's function, goto Settings, and select Edit. Then scroll down to the Recent Deliveries section.
Select the latest delivery entry by clicking on the options ... button. After expansion, you should see the Header information, which includes the Event Type, similar to this below:
Request URL: https://introfunc.azurewebsites.net/api/HttpTrigger1?code=aUjXIpqdJ0ZHPQuB0SzFegxGJu0nAXmsQBnmkCpJ6RYxleRaoxJ8cQ%3D%3D
Request method: POST
content-type: application/json
Expect:
User-Agent: GitHub-Hookshot/16496cb
X-GitHub-Delivery: 9ed46280-6ab3-11e9-8a19-f1a14922a239
X-GitHub-Event: gollum
Webhooks require a couple of configuration options before you can use them. We'll go through each of these settings next.
Note:
Payload URL
The payload URL is the URL of the server that will receive the webhook POST requests. Each event type has a specific payload format. That payload contains information about the event that triggered the webhook.Content Type
Webhooks can be delivered using two different content types:
a)The application/json content type delivers the JSON payload directly as the body of the POST request.
a) The application/x-www-form-urlencoded content type sends the JSON payload as a form parameter, called payload.
You'll also see that the payload contains information indicating that your wiki page was edited. The payload contains pages, repository, and sender sections.
Wrapping Up
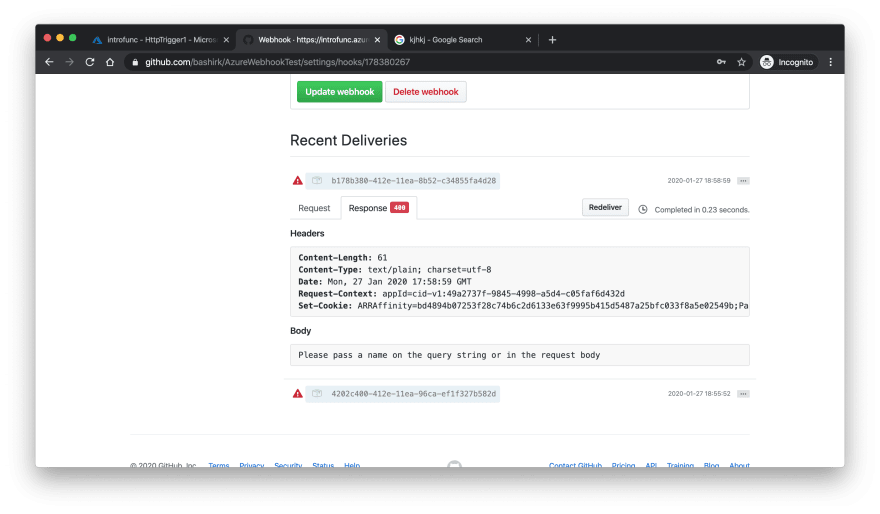
Now you'll see a response message generated by your Azure function app. This response message should be same as this: Please pass a name on the query string or in the request body.
Finally, let us update our function to parse information from the payload, and return the output.
To do this, navigate to the index.js of your function app, then replace the current if...else block in the function body with the following code.
if (req.body.pages[0].title){
    context.res = {
        body: "The current page is " + req.body.pages[0].title + ", The action taken is " + req.body.pages[0].action + ", and the event type for the action is " + req.headers['x-github-event']
    };
}

else {
    context.res = {
        status: 400,
        body: (The payload for the Wiki event is invalid")
    }
}
Hit Save after this update. We can now run a final test to see everything working.
To do this head over to your GitHub repo settings, then select Webhooks, select Edit and navigate to Recent deliveries, then select the latest delivery by clicking the ellipsis ..., and select Redeliver.
At this stage, if you see a pop up asking if you want to redeliver the payload, select Yes. Now when you select the Response tab, you should be seeing a response (parsed by the function) similar to the below:
The current page is Home, The action taken is edited, and the event type for the action is gollum
Conclusion
In this article, I walked you through how to setup an Azure Function app, create and setup a webhook on GitHub, connect this webhook with the created Function app to listen to Wiki update events (Gollum events, in this case), and parse data from your payload with your Azure Function app.
With this knowledge, you can now parse any content or information from your webhook payload with your function code.
I do hope you've enjoyed reading this as much as I did putting it into writing, you can find me on Twitter: @_bashirk, if you want more contents like this. Cheers!


Top comments (0)