5 steps to better GCP network performance
Colt McAnlis
Developer Advocate
We’re admittedly a little biased, but we’re pretty proud of our networking technology. Jupiter, the Andromeda network virtualization stack and TCP-BBR all ride on datacenters around the world and the intercontinental cables that connect them all.
As a Google Cloud customer, your applications already have access to this fast, global network, giving your VM-to-VM communication top-tier performance. Furthermore, because Google peers its egress traffic directly with a number of companies (including Cloudflare), you can get content to your customers faster, with lower egress costs.
With that in mind, it’s really easy to make small configuration changes, location updates or architectural changes that can inadvertently limit the networking performance of your system. Here are the top five things you can do to get the most out of Google Cloud.
1. Know your tools
Testing your networking performance is the first step to improving your environment. Here are the tools I use on a daily basis:- Iperf is a commonly used network testing tool that can create TCP/UDP data streams and measure the throughput of the network that carries them.
- Netperf is another good network testing tool, which is also used by the PerfKitBenchmark suite to test performance and benchmark the various cloud providers against one another.
- traceroute is a computer network diagnostic tool to measure and display packets’ routes across a network. It records the route’s history as the round-trip times of the packets received from each successive host in the route; the sum of the mean times in each hop is a measure of the total time spent to establish the connection.
2. Put instances in the right zones
One important thing to remember about network latency is that it’s a function of physics.
The speed of light traveling in a vacuum is 300,000 km/s, meaning that it takes about 10ms to travel a distance of ~3000km — about the distance of New York to Santa Fe. But because the internet is built on fiber-optic cable, which slows things down by a factor of ~1.52, data can only travel 1,973km one way in that same 10ms.
So, the farther away two machines are, the higher their latency will be. Thankfully, Google has datacenter locations all around the world, making it easy to put your compute close to your users.
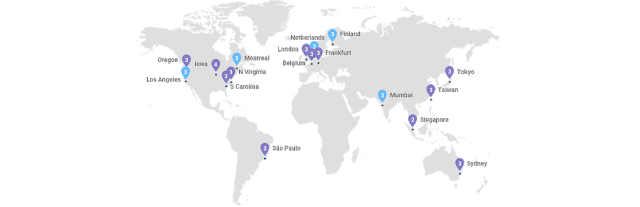
It’s worthwhile to take a regular look at where your instances are deployed, and see if there’s an opportunity to open up operations in a new region. Doing so will help reduce latency to the end user, and also help create a system of redundancy to help safeguard against various types of networking calamity.
3. Choose the right core-count for your networking needs
According to the Compute Engine documentation:
Outbound or egress traffic from a virtual machine is subject to maximum network egress throughput caps. These caps are dependent on the number of vCPUs that a virtual machine instance has. Each core is subject to a 2 Gbits/second (Gbps) cap for peak performance. Each additional core increases the network cap, up to a theoretical maximum of 16 Gbps for each virtual machine.
In other words, the more virtual CPUs in a guest, the more networking throughput you get. You can see this yourself by setting up a bunch of instance types, and logging their IPerf performance:
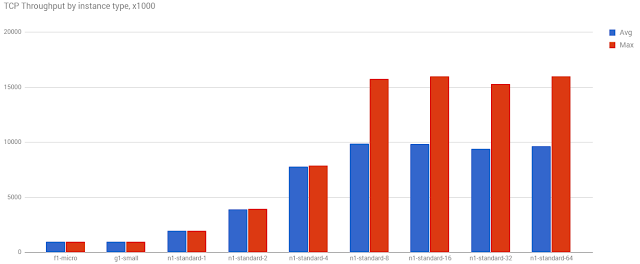
You can clearly see that as the core count goes up, so does the avg. and max. throughput. Even with our simple test, we can see that hard 16Gbps limit on the higher machines.
As such, it’s critically important to choose the right type of instance for your networking needs. Picking something too large can cause you to over-provision (and over pay!), while too few cores places a hard limit on your maximum throughput speeds.
4. Use internal over external IPs
Any time you transfer data or communicate between VMs, you can achieve max performance by always using the internal IP to communicate. In many cases, the difference in speed can be drastic. Below, you can see for a N1 machine, the bandwidth measured through iperf to the external IP was only 884 Mbits/sec
However, the internal IP between the two machines boasted 1.95 Gbits / sec:
5. Rightsize your TCP window
If you have ever wondered why a connection transmits at a fraction of the available bandwidth — even when both the client and the server are capable of higher rates — then it might be due to a window size mismatch.
The Transmission Control Protocol (aka TCP) works by sending windows of data over the internet, relying on a straightforward system of handshakes and acknowledgements to ensure arrival and integrity of the data, and in some cases, to resend it. On the plus side, this results in a very stable internet. On the downside, it results in lots of extra traffic. And when the sender or receiver stop and wait for ACKs for previous windows/packets, this creates gaps in the data flow, limiting the maximum throughput of the connection.
Imagine, for example, a saturated peer that is advertising a small receive window, bad network weather and high packet loss resetting the congestion window, or explicit traffic shaping limiting the throughput of your connection. To address this problem, window sizes should be just big enough such that either side can continue sending data until it receives an ACK for an earlier packet. Keeping windows small limits your connection throughput, regardless of the available or advertised bandwidth between instances.
For the best performance possible in your application, you should really fine-tune window sizes depending on your client connections, estimated egress and bandwidth constraints. The good news is that the TCP window sizes on standard GCP VMs are are tuned for high-performance throughput. So be sure you test the defaults before you make any changes (sometimes, it might not be needed!)

Every millisecond counts
Getting peak performance across a cloud-native architecture is rarely achieved by fixing just one problem. It’s usually a combination of issues, the “death by a thousand cuts” as it were, that chips away at your performance, piece by piece. By following these five steps, you’ll be able to isolate, identify and address some of the most common culprits of poor network performance, to help you take advantage of all the networking performance that’s available to you.If you’d like to know more about ways to optimize your Google Cloud applications, check out the rest of the Google Cloud Performance Atlas blog posts and videos. Because, when it comes to performance, every millisecond counts.