Containers
How to build container images with Amazon EKS on Fargate
This post was contributed by Re Alvarez Parmar and Olly Pomeroy
Containers help developers simplify the way they package, distribute, and deploy their applications. Developers package their code into a container image that includes the application code, libraries, and any other dependencies. This image can be used to deploy the containerized application on any compatible operating system. Since its launch in 2013, Docker has made it easy to run containers, build images, and push them to repositories.
However, building containers using Docker in environments like Amazon ECS and Amazon EKS requires running Docker in Docker, which has profound implications. Perhaps the least attractive prerequisite for using Docker to build container images in containerized environments is the requirement to run containers in privileged mode, a practice most security-conscious developers would like to avoid. Using Docker to build an image on your laptop may not have severe security implications. Still, it is best to avoid giving containers elevated privileges in a Kubernetes cluster. This hard requirement also makes it impossible to use Docker with EKS on Fargate to build container images because Fargate doesn’t permit privileged containers.
kaniko
New tools have emerged in the past few years to address the problem of building container images without requiring privileged mode. kaniko is one such tool that builds container images from a Dockerfile, much like Docker does. But unlike Docker, it doesn’t depend on a Docker daemon and it executes each command within a Dockerfile entirely in userspace. Thus, it permits you to build container images in environments that can’t easily or securely run a Docker daemon, such as a standard Kubernetes cluster, or on Fargate.
Jenkins
DevOps teams automate container images builds using continuous delivery (CD) tools. AWS customers can either use a fully managed continuous delivery service, like AWS CodePipeline, that automates the software builds, tests, and deployments. Customers can also deploy a self-managed solution like Jenkins on Amazon EC2, Amazon ECS, or Amazon EKS.
Many AWS customers that run a self-managed Jenkins cluster choose to run it in ECS or EKS. Customers running Jenkins on EKS or ECS can use Fargate to run a Jenkins cluster and Jenkins agents without managing servers. Given that Jenkins requires data persistence, you needed EC2 instances to run a Jenkins cluster in the past. Fargate now integrates with Amazon Elastic File System (EFS) to provide storage for your applications, so you can also run the Jenkins controller and agents with EKS and Fargate.
Using kaniko to build your containers and Jenkins to orchestrate build pipelines, you can operate your entire CD infrastructure without any EC2 instances.
How can Fargate help with your self-managed CD infrastructure?
CD workloads are bursty. During business hours, developers check-in their code changes, which triggers CD pipelines, and the demand on the CD system increases. If adequate compute capacity is unavailable, the pipelines compete for resources, and developers have to wait longer to know the effects of their changes. The result is a decline in developer productivity. During off hours, the infrastructure needs to scale back down to the reduce expenses.
Optimizing infrastructure capacity for performance and cost at the same time is challenging for DevOps engineers. On top of that, DevOps teams running self-managed CD infrastructure on Kubernetes are also responsible for managing, scaling, and upgrading their worker nodes.
Teams using Fargate have more time for solving business challenges because they spend less time maintaining servers. Running your CD infrastructure on EKS on Fargate reduces your DevOps team’s operational burden. Besides the obvious benefit of not having to create and manage servers or AMIs, Fargate makes it easy for DevOps teams to operate CD workloads in Kubernetes in these ways:
Easier Kubernetes data plane scaling
Continuous delivery workload constantly fluctuates as code changes trigger pipeline executions. With Fargate, your Kubernetes data plane scales automatically as pods are created and terminated. This means your Kubernetes data plane will scale up as build pipelines get triggered, and scale down as the jobs complete. You don’t even have to run Kubernetes Cluster Autoscaler if your cluster is entirely run on Fargate.
Improved process isolation
Shared clusters without strict compute resource isolation can experience resource contention as multiple containers compete for CPU, memory, disk, and network. Fargate runs each pod in a VM-isolated environment; in other words, no two pods share the same VM. As a result, concurrent CD work streams don’t compete for compute resources.
Simplify Kubernetes upgrades
Upgrading EKS is a two step process. First, you’ll upgrade the EKS control plane. Once finished, you’ll upgrade the data plane and Kubernetes add-ons. Whereas in EC2, you have to cordon nodes, evict pods, and upgrade nodes in batches, in Fargate, to upgrade a node, all you have to do is restart its pod. That’s it.
Pay per pod
In Fargate, you pay for the CPU and memory you reserve for your pods. This can help you reduce your AWS bill since you don’t have to pay for any idle capacity you’d usually have when using EC2 instances to execute CI pipelines. You can further reduce your Fargate costs by getting a Compute Savings Plan.
Fargate also meets the standards for PCI DSS Level 1, ISO 9001, ISO 27001, ISO 27017, ISO 27018, SOC 1, SOC 2, SOC 3, and HIPAA eligibility. For an in-depth look at the benefits of Fargate, we recommend Massimo Re Ferre’s post saving money a pod at a time with EKS, Fargate, and AWS Compute Savings Plans.
Solution
We will create an EKS cluster that will host our Jenkins cluster. Jenkins will run on Fargate, and we’ll use Amazon EFS to persist Jenkins configuration. A Network Load Balancer will distribute traffic to Jenkins. Once Jenkins is operational, we’ll create a pipeline to build container images on Fargate using kaniko.

You will need the following to complete the tutorial:
Let’s start by setting a few environment variables:
export JOF_ACCOUNT_ID=$(aws sts get-caller-identity --query 'Account' --output text)
export JOF_REGION="ap-southeast-1"
export JOF_EKS_CLUSTER=jenkins-on-fargate
Create an EKS cluster
We’ll use eksctl to create an EKS cluster backed by Fargate. This cluster will have no EC2 instances. Create a cluster:
eksctl create cluster \
  --name $JOF_EKS_CLUSTER \
  --region $JOF_REGION \
  --version 1.18 \
  --fargate
With the –-fargate option, eksctl creates a pod execution role and Fargate profile and patches the coredns deployment so that it can run on Fargate.
Prepare the environment
The container image that we’ll use to run Jenkins stores data under /var/jenkins_home path of the container. We’ll use Amazon EFS to create a file system that we can mount in the Jenkins pod as a persistent volume. This persistent volume will prevent data loss if the Jenkins pod terminates or restarts.
Download the script to prepare the environment:
curl -O https://raw.githubusercontent.com/aws-samples/containers-blog-maelstrom/main/EFS-Jenkins/create-env.sh
chmod +x create-env.sh
. ./create-env.sh
The script will:
- create an EFS file system, EFS mount points, an EFS access point, and a security group
- create an EFS-backed storage class, persistent volume, and persistent volume claim
- deploy the AWS Load Balancer Controller
Install Jenkins
With the load balancer and persistent storage configured, we’re ready to install Jenkins.
Use Helm to install Jenkins in your EKS cluster:
helm repo add jenkins https://charts.jenkins.io && helm repo update &>/dev/null

helm install jenkins jenkins/jenkins \
  --set rbac.create=true \
  --set controller.servicePort=80 \
  --set controller.serviceType=ClusterIP \
  --set persistence.existingClaim=jenkins-efs-claim \
  --set controller.resources.requests.cpu=2000m \
  --set controller.resources.requests.memory=4096Mi \
  --set controller.serviceAnnotations."service\.beta\.kubernetes\.io/aws-load-balancer-type"=nlb-ip
The Jenkins Helm chart creates a statefulset with 1 replica, and the pod will have 2 vCPUs and 4 GB memory. Jenkins will store its data and configuration at /var/jenkins_home path of the container, which is mapped to the EFS file system we created for Jenkins earlier in this post.
Get the load balancer’s DNS name:
printf $(kubectl get service jenkins -o \
  jsonpath="{.status.loadBalancer.ingress[].hostname}");echo
Copy the load balancer’s DNS name and paste it in your browser. You should be taken to the Jenkins dashboard. Log in with username admin. Retrieve the admin user’s password from Kubernetes secrets:
printf $(kubectl get secret jenkins -o \
  jsonpath="{.data.jenkins-admin-password}" \
  | base64 --decode);echo
Build images
With Jenkins set up, let’s create a pipeline that includes a step to build container images using kaniko.
Create three Amazon Elastic Container Registry (ECR) repositories that will be used to store the container images for the Jenkins agent, kaniko executor, and sample application used in this demo:
JOF_JENKINS_AGENT_REPOSITORY=$(aws ecr create-repository \
  --repository-name jenkins \
  --region $JOF_REGION \
  --query 'repository.repositoryUri' \
  --output text)

JOF_KANIKO_REPOSITORY=$(aws ecr create-repository \
  --repository-name kaniko \
  --region $JOF_REGION \
  --query 'repository.repositoryUri' \
  --output text)

JOF_MYSFITS_REPOSITORY=$(aws ecr create-repository \
  --repository-name mysfits \
  --region $JOF_REGION \
  --query 'repository.repositoryUri' \
  --output text)
Prepare the Jenkins agent container image:
aws ecr get-login-password \
  --region $JOF_REGION | \
  docker login \
    --username AWS \
    --password-stdin $JOF_JENKINS_AGENT_REPOSITORY

docker pull jenkins/inbound-agent:4.3-4-alpine
docker tag docker.io/jenkins/inbound-agent:4.3-4-alpine $JOF_JENKINS_AGENT_REPOSITORY
docker push $JOF_JENKINS_AGENT_REPOSITORY
Prepare the kaniko container image:
mkdir kaniko
cd kaniko

cat > Dockerfile<<EOF
FROM gcr.io/kaniko-project/executor:debug
COPY ./config.json /kaniko/.docker/config.json
EOF

cat > config.json<<EOF
{ "credsStore": "ecr-login" }
EOF

docker build -t $JOF_KANIKO_REPOSITORY .
docker push $JOF_KANIKO_REPOSITORY
Create an IAM role for Jenkins service account. The role lets Jenkins agent pods push and pull images to and from ECR:
eksctl create iamserviceaccount \
    --attach-policy-arn arn:aws:iam::aws:policy/AmazonEC2ContainerRegistryPowerUser \
    --cluster $JOF_EKS_CLUSTER \
    --name jenkins-sa-agent \
    --namespace default \
    --override-existing-serviceaccounts \
    --region $JOF_REGION \
    --approve
Create a new job in the UI:

Give your job a name and create a new pipeline:

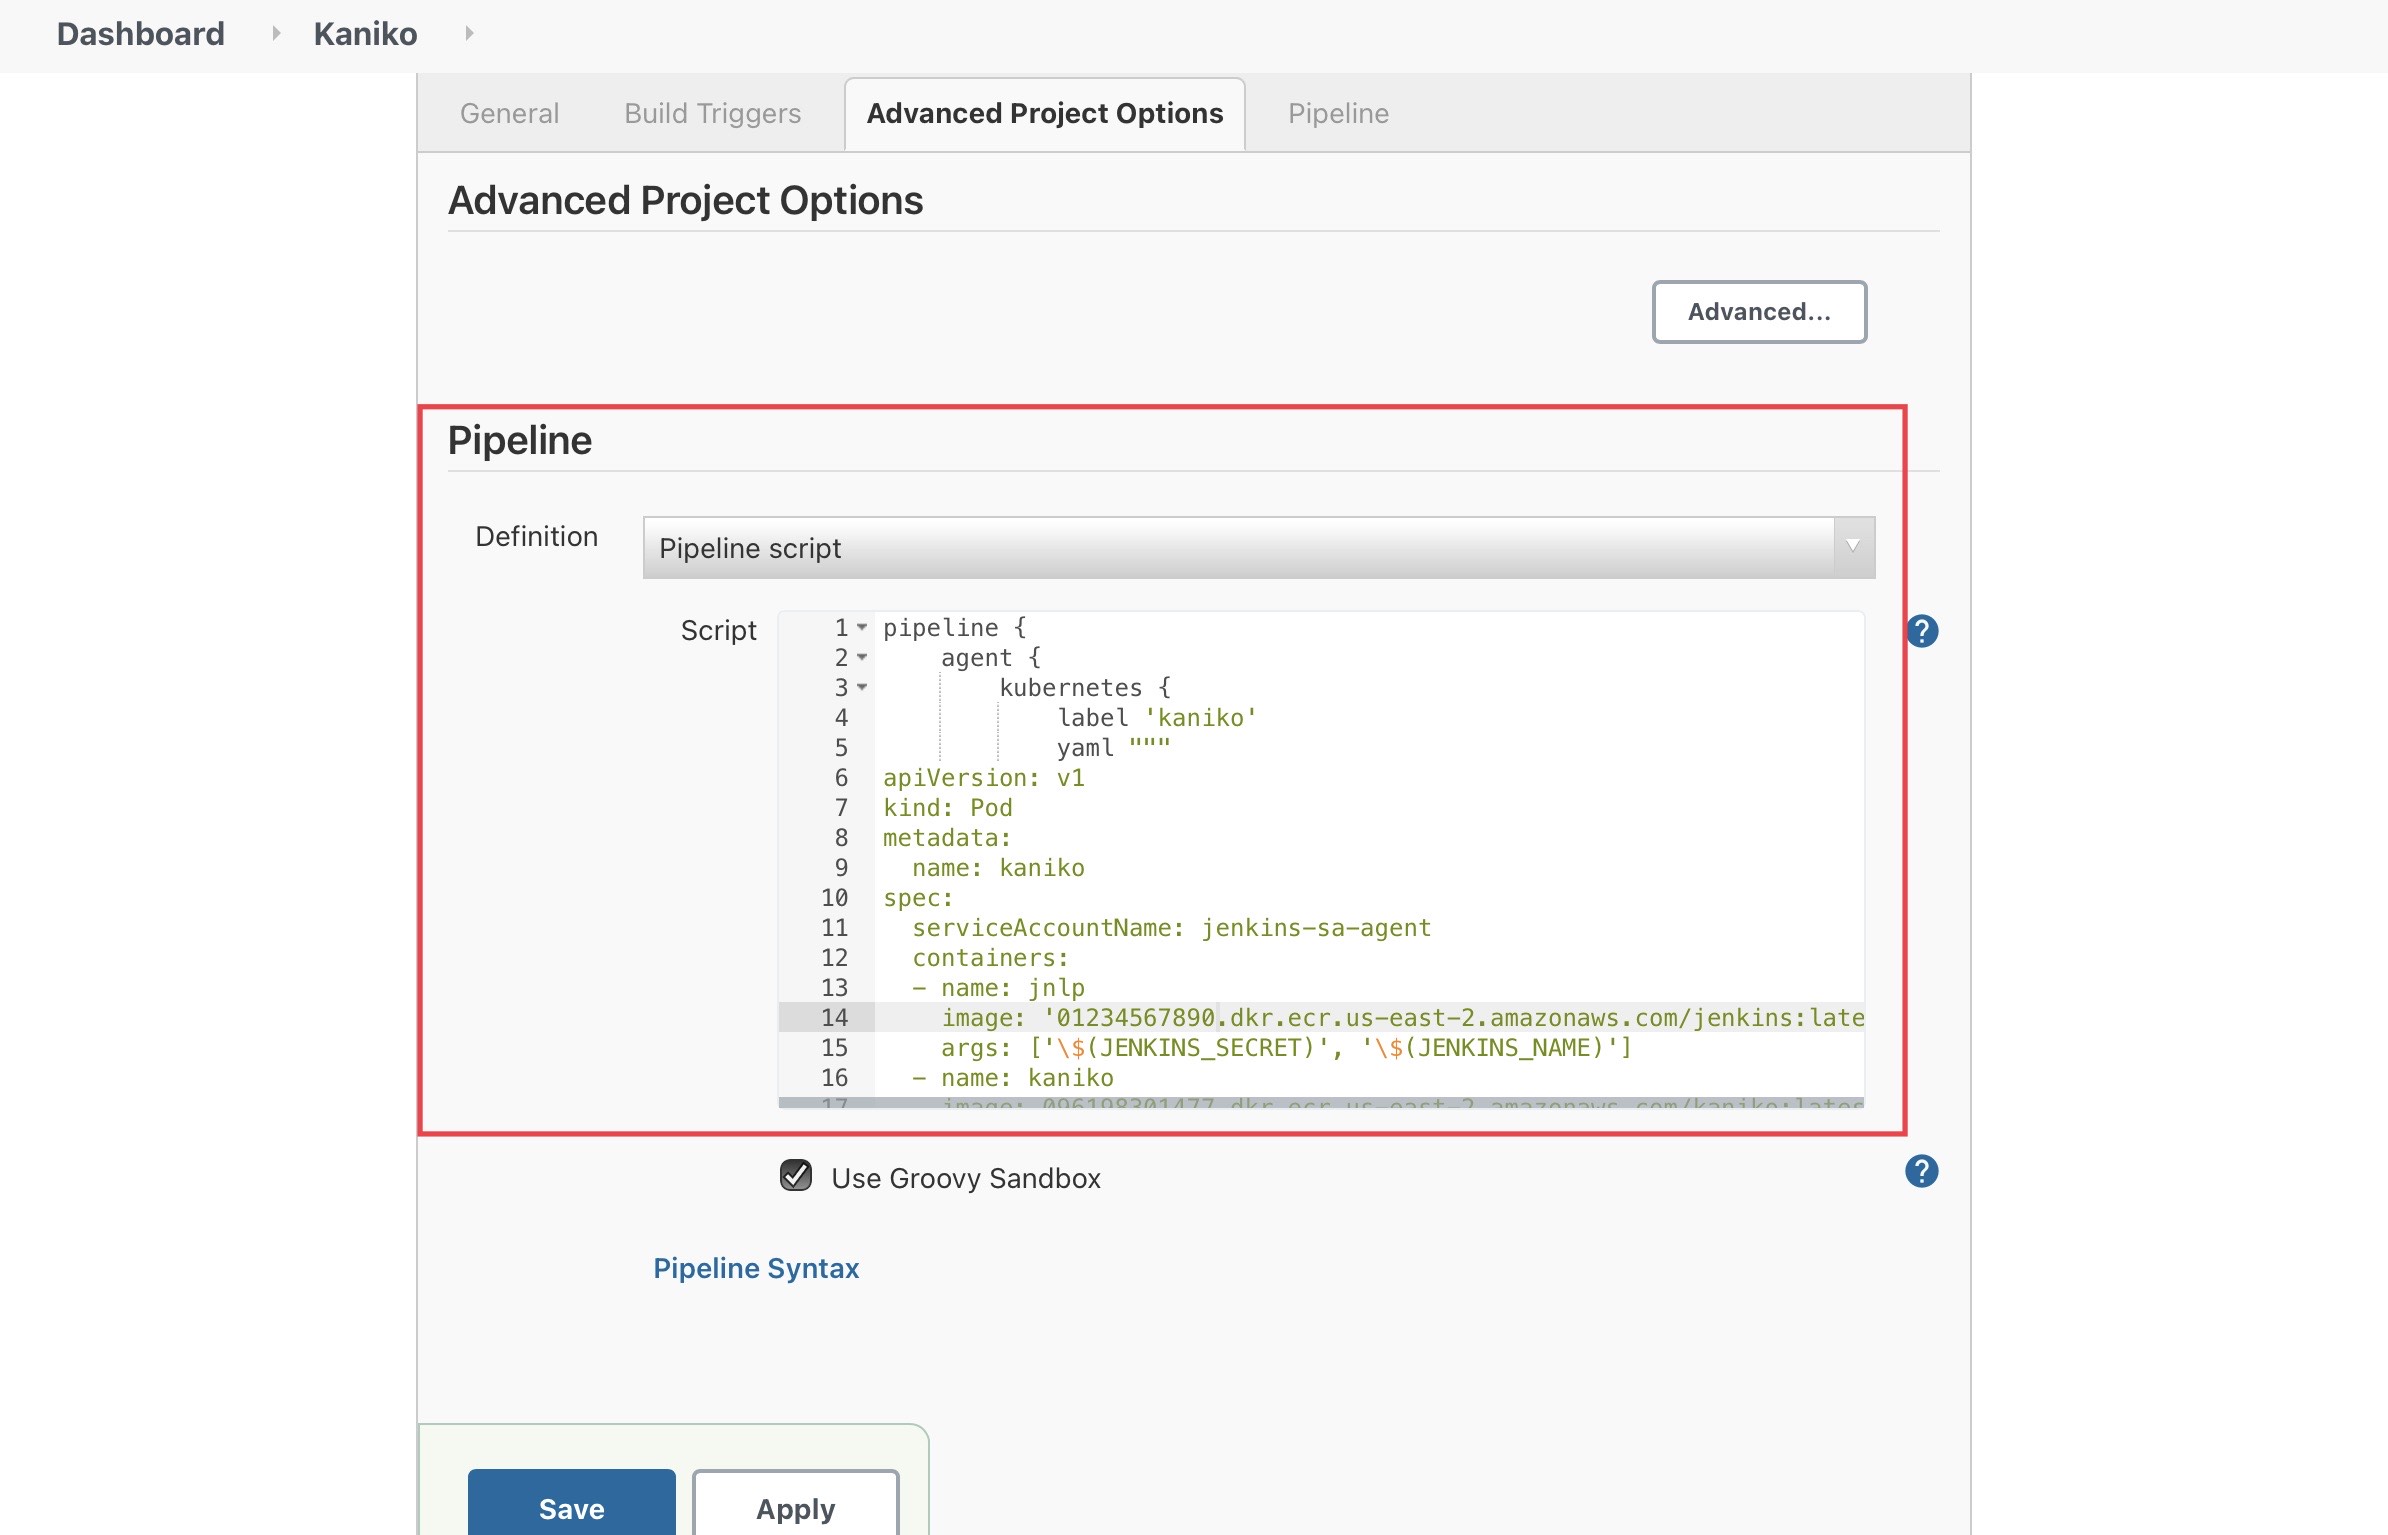
Return to the CLI and create a file with the pipeline configuration:
cat > kaniko-demo-pipeline.json <<EOF
pipeline {
    agent {
        kubernetes {
            label 'kaniko'
            yaml """
apiVersion: v1
kind: Pod
metadata:
  name: kaniko
spec:
  serviceAccountName: jenkins-sa-agent
  containers:
  - name: jnlp
    image: '$(echo $JOF_JENKINS_AGENT_REPOSITORY):latest'
    args: ['\\\$(JENKINS_SECRET)', '\\\$(JENKINS_NAME)']
  - name: kaniko
    image: $(echo $JOF_KANIKO_REPOSITORY):latest
    imagePullPolicy: Always
    command:
    - /busybox/cat
    tty: true
  restartPolicy: Never
"""
        }
    }
    stages {
        stage('Make Image') {
            environment {
                DOCKERFILE  = "Dockerfile.v3"
                GITREPO     = "git://github.com/ollypom/mysfits.git"
                CONTEXT     = "./api"
                REGISTRY    = '$(echo ${JOF_MYSFITS_REPOSITORY%/*})'
                IMAGE       = 'mysfits'
                TAG         = 'latest'
            }
            steps {
                container(name: 'kaniko', shell: '/busybox/sh') {
                    sh '''#!/busybox/sh
                    /kaniko/executor \\
                    --context=\${GITREPO} \\
                    --context-sub-path=\${CONTEXT} \\
                    --dockerfile=\${DOCKERFILE} \\
                    --destination=\${REGISTRY}/\${IMAGE}:\${TAG}
                    '''
                }
            }
        }
    }
}
EOF
Copy the contents of kaniko-demo-pipeline.json and paste it into the pipeline script section in Jenkins. It should look like this:
Click the Build Now button to trigger a build.
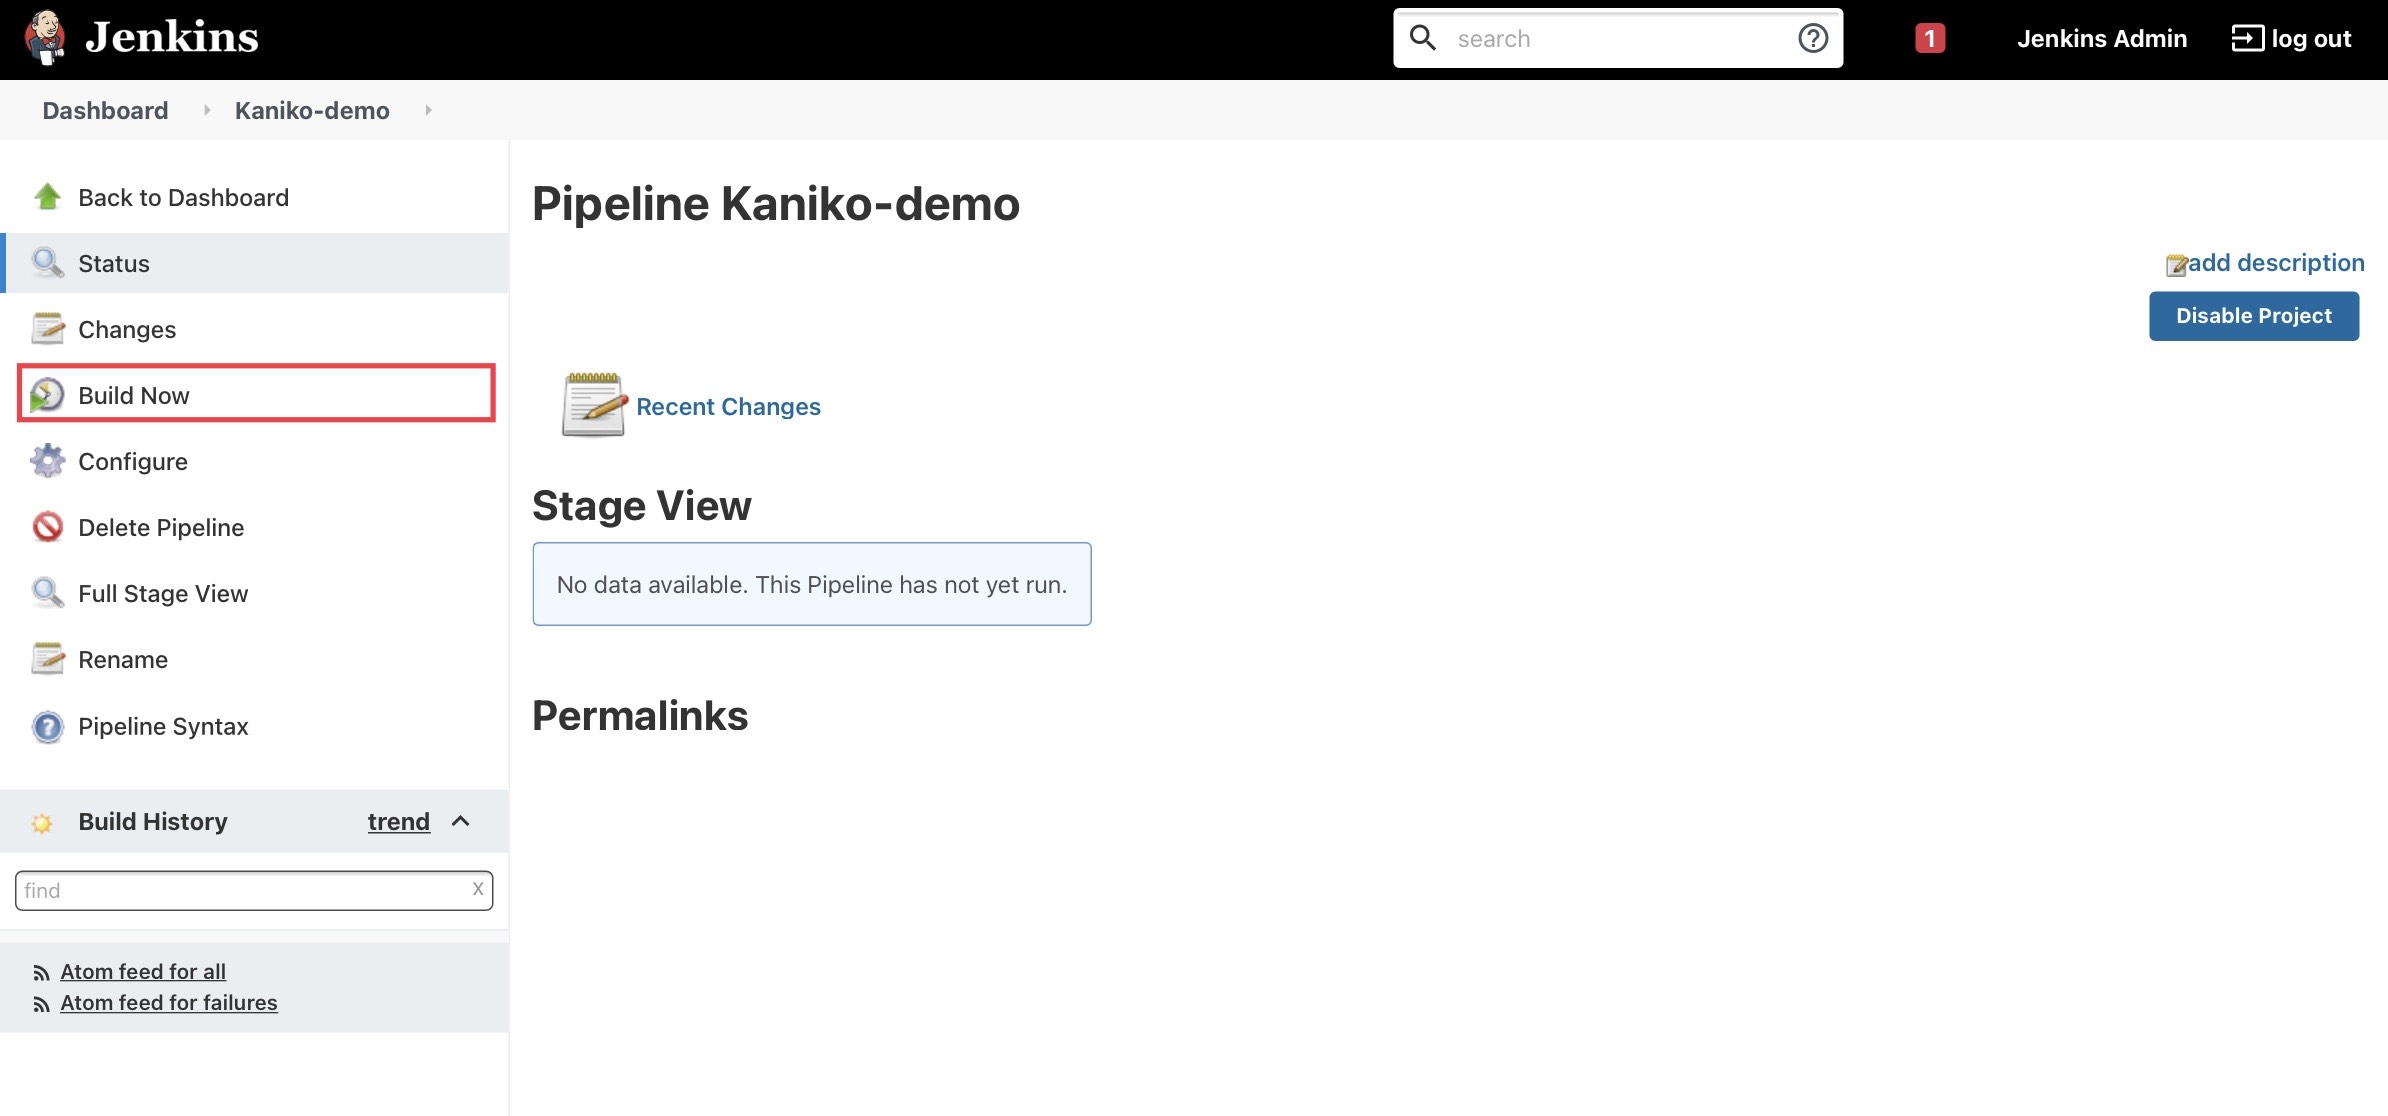
Once you trigger the build you’ll see that Jenkins has a created another pod. The pipeline uses the Kubernetes plugin for Jenkins to run dynamic Jenkins agents in Kubernetes. The kaniko executor container in this pod will clone to code from the sample code repository, build a container image using the Dockerfile in the project, and push the built image to ECR.
kubectl get pods
NAME                 READY   STATUS    RESTARTS   AGE
jenkins-0            2/2     Running   0          4m
kaniko-wb2pr-ncc61   0/2     Pending   0          2s
You can see the build by selecting the build in Jenkins and going to Console Output.

Once the build completes, return to AWS CLI and verify that the built container image has been pushed to the sample application’s ECR repository:
aws ecr describe-images \
  --repository-name mysfits \
  --region $JOF_REGION
The output of the command above should show a new image in the ‘mysfits’ repository.

Cleanup
helm delete jenkins
helm delete aws-load-balancer-controller --namespace kube-system
aws efs delete-access-point --access-point-id $(aws efs describe-access-points --file-system-id $JOF_EFS_FS_ID --region $JOF_REGION --query 'AccessPoints[0].AccessPointId' --output text) --region $JOF_REGION
for mount_target in $(aws efs describe-mount-targets --file-system-id $JOF_EFS_FS_ID --region $JOF_REGION --query 'MountTargets[].MountTargetId' --output text); do aws efs delete-mount-target --mount-target-id $mount_target --region $JOF_REGION; done
sleep 5
aws efs delete-file-system --file-system-id $JOF_EFS_FS_ID --region $JOF_REGION
aws ec2 delete-security-group --group-id $JOF_EFS_SG_ID --region $JOF_REGION
eksctl delete cluster $JOF_EKS_CLUSTER --region $JOF_REGION
aws ecr delete-repository --repository-name jenkins --force --region $JOF_REGION
aws ecr delete-repository --repository-name mysfits --force --region $JOF_REGION
aws ecr delete-repository --repository-name kaniko --force --region $JOF_REGION
Conclusion
With EKS on Fargate, you can run your continuous delivery automation without managing servers, AMIs, and worker nodes. Fargate autoscales your Kubernetes data plane as applications scale in and out. In the case of automated software builds, EKS on Fargate autoscales as pipelines trigger builds, which ensures that each build gets the capacity it requires. This post demonstrated how you can a Jenkins cluster entirely on Fargate and perform container image builds without the need of --privileged mode.